


So one of my resolutions this year was to make my own sourdough starter and, of course, sourdough bread. I have tried once before and for whatever reason that did not work out that time. This time around I followed a very straightforward "recipe" or protocol and found it to be fairly simple and forgiving.
Thank you to Pantry Mama for breaking it down and hopefully this post also feels really simple and easy to absorb! Its easy to get overwhelmed with information, so just get started and see what works for you!
I think when broken down its really simple, it's just about understanding your starter and what is happening when. For example, making it when its warm v. cold in your home will change how fast it develops.
I documented the journey on TikTok if you want to see my thoughts in real time! I also got some advice from people online that I found really helpful! I will be sure to note that in the post as well, don't worry!
Let's get into it!

QUICK RUNDOWN
DAY 1:
50g. Flour
50g. Water
DAY 2:
DAY 3:
DAY 4:
DAY 5:
DAY 6:
DAY 7:
CONTINUE FOR 14 DAYS BEFORE MAKING ANY BREAD
INGREDIENTS & TOOLS
Flour
Water
Scale
Wooden Spoon
Jar with some sort of lid
INSTRUCTIONS
DAY 1
Today is 50g of water and 50g of flour combined in a clean jar. With the end of a wooden spoon, mix the water & flour together in the jar, cover loosely.
Place the starter somewhere warm for the next 24 hrs. If your house is cold, pop it near a warm appliance. In my case, I microwaved a cup of water and then placed the jar in the microwave with the warm water.
DAY 2:
DAY 3:
DAY 4:
DAY 5:
DAY 6:
DAY 7:
DAY 1:


Today is 50g of water and 50g of flour combined in a clean jar. With the end of a wooden spoon, mix the water & flour together in the jar, cover loosely.
Place the starter somewhere warm for the next 24 hrs. If your house is cold, pop it near a warm appliance. In my case, I microwaved a cup of water and then placed the jar in the microwave with the warm water.
DAY 2:


Once 24 hours passes, you need to check on it and give it a good stir.
You do not need to add anything today - just get some oxygen into your mixture and then lossely cover and set aside for another 24 hours.
Your starter may already have some bubbles forming - this is a great sign. But it's also totally fine if it's not doing anything.
DAY 3:


Discard 50g of your starter.
Then, add 50g of flour and 50g of water to the remaining 50g of starter in your jar.
Mix it together with the end of a wooden spoon, being sure to get lots of oxygen into your mixture. Loosely cover and set it aside until tomorrow.
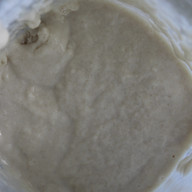
At this stage it's completely normal for it to smell and to have developed a layer of liquid on top (aka hooch). It might look like the water has separated from the flour but it's just telling you that it's hungry. Stir the hooch in when you feed your starter. It's also a great sign if it begins to double in size.
DAY 4:


Remove 100g of your starter and then add 50g of flour and 50g of water to the remaining 50g of starter in your jar.
Mix it all together with the end of a wooden spoon. Cover again.
You’ll need to do this twice today, around 12 hours apart. Your starter will be forgiving but make sure you note the time of day you feed.
DAY 5:


Remove 100g of your starter and then add 50g of flour and 50g of water to the remaining 50g of starter in your jar.
Mix it all together with the end of a wooden spoon. Cover again.
You’ll need to do this twice today, around 12 hours apart.
I also like to make sure I'm watching the lines on my mason jar to note what level it's at when I feed vs 12 hours later.
DAY 6:


Remove 100g of your starter and then add 50g of flour and 50g of water to the remaining 50g of starter in your jar.
Mix it all together with the end of a wooden spoon. Cover again.
You’ll need to do this twice today, around 12 hours apart.
DAY 7:


YAY! Your sourdough starter is a whole week old. Keep feeding twice a day as you have been for at least 14 days.
Now I know you want to get to baking bread … but just remember that the most important thing about this whole process is time. Your starter might be ready, but chances are it will need a bit longer to mature - generally 14 days.
You need to keep feeding your starter the same way as you have been, twice a day (discarding before you feed) until it's consistently doubling within around 2-6 hours after you've fed it. Once it's consistently doubling after every feed you can try and bake with it. Your starter will keep maturing as you use it.


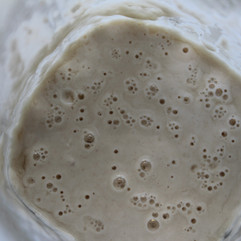
So as the days go on, you'll notice more and more activity, aka bubbles, hooch, and rise.
Transparently it took a little over two weeks for my starter to get active enough to use for bread. Even my first loaf wasn't my absolute best or favorite BUT it was bread and it was good.
With more time, my starter has matured, aka gotten more flavorful. My second loaf with this starter was even better and so delicious.
READY TO MAKE BREAD


This was how my starter looked once it was ready for my first loaf. If you're at the stage where you're ready to make your first loaf, congrats!
My blog post detailing my first loaf and now preferred recipe for sourdough bread is coming soon. Subscribe to my email newsletter below so you never miss a post!

If you plan on saving this recipe for later via Pinterest, feel free to use this image!
Please tag me if you end up making this recipe, I would LOVE to see how it turns out!!
Comments